
Photography is one of my most consistent creative practices, and I’ve dabbled in astrophotography, which is photography of stars, planets, moons and other celestial objects in the night sky. I’ve used my cameras for astrophotography with varying levels of success, but the main issue I have faced is a total lack of tools to track the motion of stars during long exposures.
I’ve captured roughly 50,000 images in the 18 years since I bought my first digital camera, a Fujifilm FinePix S700. These days, I take most of my photos on a Google Pixel 8 Pro. Recently, I took one giant leap forward with the $599 DwarfLab Dwarf 3 Smart Telescope, a feature-packed compact telescope.
I’ve been testing the Dwarf 3 for the past two months and, not only has it changed my perspective on astrophotography without a bulky telescope and camera adapter setup, but I found it has excellent tools for other kinds of photography.
Excellent tech in a small package
The Dwarf 3 smart telescope includes almost everything you need — except a tripod
The Dwarf 3 is chunky, gray and rectangular, similar in size to a hardback book or a Steam Deck. At just under 3 pounds, it feels solid without being too heavy. I like that it comes with a handy carrying case, but the Dwarf 3 easily fits in a small backpack when space is at a premium.
Inside the Dwarf 3, you’ll find a Sony IMX678 Starvis 2 sensor, which specializes in low-light imagery, though its daytime performance is also good based on my testing. Dwarf 3 has two lens options: telephoto and wide. The focal length of the telephoto lens is equivalent to 737mm, which isn’t as powerful as traditional telescopes selling for the same price. Still, the built-in photography functions make up some of the difference. While I like the wide-angle lens, I mainly use it to find subjects for the telephoto lens in the DwarfLab app.
The carrying case has straps on the bottom for a tripod — though my favorite tripod is probably a little too bulky.
As nice as the sensor and lenses are, the camera tops out at 4K resolution. In most circumstances, this would mean the camera is well-suited to creating images that look good on large displays. But it’s more limiting for astrophotography, especially compared to using a powerful DSLR with a powerful telescope. Still, Dwarf 3 is a great entry point for people who are interested in the hobby but don’t have the expensive equipment.
Much of the weight comes from an internal battery and motors. The battery weighs in at a hefty 10,000 mAh, which lasts up to 16 hours in standby mode, though you can expect between 5 and 7 hours of runtime in most of the photography modes — Dwarf 3 will last just over 3 hours for video. There’s a USB-C port on the telescope’s base so you can connect an external power supply or a computer. Putting the port on the base is also great because you don’t need to worry about cords impeding the telescope’s tracking features.
Digging into the DwarfLab App
You’ll spend most of your time in the photo preview, but the app’s other tabs are helpful for secondary tasks.
Speaking of the app, it mostly works as intended. The biggest problem I encountered was getting it to connect to the telescope. In theory, you can use the smart telescope’s NFC function for a quick connection, but it often takes a few tries to connect. Connecting became less of an issue as subsequent updates removed some bugs. That said, I occasionally have trouble creating a stable connection with the app crashing at times — I hope this will be more reliable in future updates. (It works best when you disconnect from other Wi-Fi networks first.)
The app’s navigation is straightforward, with the Home tab hosting the photo menu, scheduling and toggles for the onboard lighting. (It’s a good idea to turn off these lights when shooting at night.)
From the photo preview, you can choose from seven camera modes: Photo, Video, Burst, Astro, Time Lapse, Auto-Capture and Pano — more on these later.
Although each mode usually works without much adjustment, you can manually tweak a lot of settings like shutter speed, white balance, filters and focus to fit your needs. I’m happy the flexibility is there, but it can be overwhelming for folks unfamiliar with the technical aspects of photography.
The Altas tab shows a sky map, complete with constellations, star names and astronomical objects — it’s great for finding suitable subjects to photograph and includes a feature that automatically finds and tracks your favorite nebula. The Atlas also tells you what’s visible based on the location and time of day. The catalog of objects is impressive, though you can also manually choose the coordinates of an area you’d like to track.
There’s not much to the Album tab, which shows all of the photos you’ve taken with the Dwarf 3. Lastly, you’ll use the settings tab to adjust Wi-Fi preferences, update firmware, set location options and view technical information. Overall, I find the app enjoyable and easy to use.
Easier astrophotography
As much as I like the astrophotography functions on the Dwarf 3, it takes a bit of work to get stunning images.
I recommend reading through DwarfLab’s online user guide before starting since a good image relies on several factors, like preparing Astro Darks, setting up tracking, choosing the right filter and experimenting with different exposures.
Astro Darks are essentially black images that the camera uses as references when stacking individual exposures into a finished photo. They account for noise on the sensor. But you must take the darks at a similar temperature and with the same exposure as the eventual photos. Thankfully, the camera can store up to 20 sets of darks, so you don’t have to repeat the process in every photo session. While you can skip the dark frames, the resulting images won’t be as good. Plus, the darks help cut down on external editing.
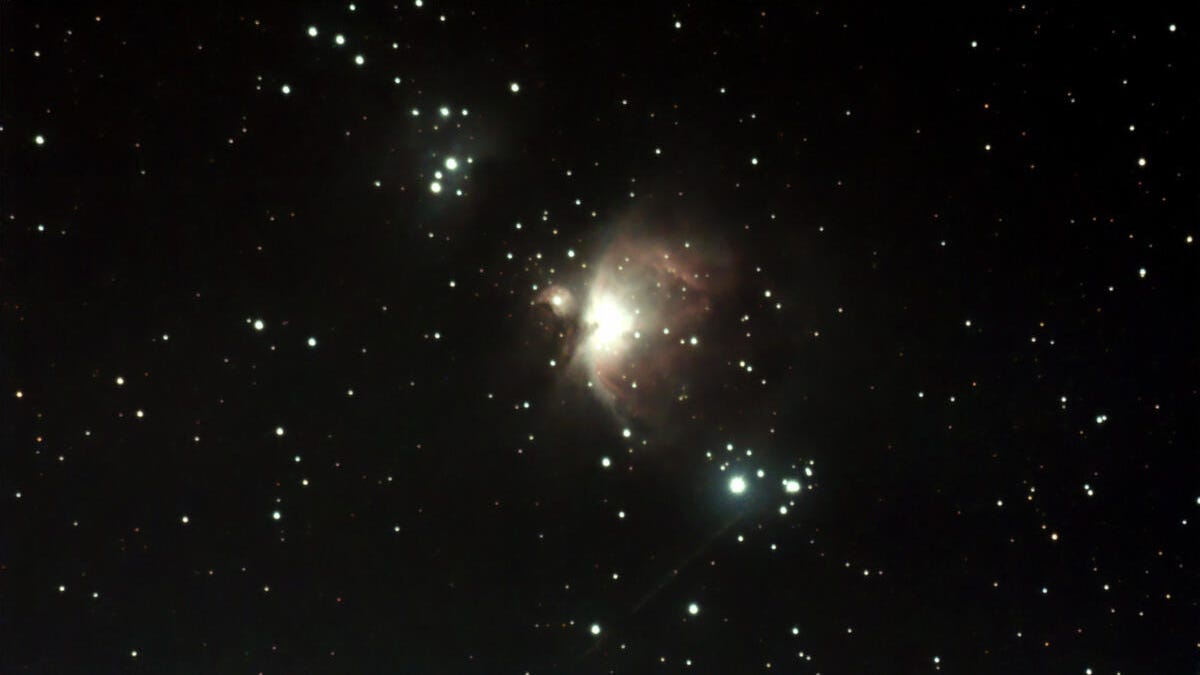
My first few Nebula images didn’t turn out as good as I’d hoped, but I cleaned up this picture of Orion using photo editing software.
You’ll use either the Astro filter or the Dual-band filter for astrophotography. The Astro filter captures more infrared light than the Dwarf 3’s visible light filter, making it ideal for imaging stars and galaxies, while the Dual-band filter targets specific wavelengths of light associated with emission nebulae.
After you’ve prepped the settings, you’ll place the camera on a level surface or tripod with its back facing north or south — depending on whether you’re in the Northern or Southern Hemisphere. From there, you’ll start the calibration phase by choosing a target in the Atlas or selecting EQ Mode (Equatorial Mode) from the Function menu. Tracking is essential if you don’t want star trails.
The Dwarf 3 telescope is a great jumping-off point for anyone interested in the hobby.
It took some trial and error, but the process felt natural after a few sessions. Once you master the basics, it’s a rewarding activity, and I loved sharing the photos I took with my friends and family. Even with the Dwarf 3, astrophotography requires a fair bit of patience. It was a great time to put on an audiobook and experiment with a few shorter sessions. That said, this smart telescope can run on a schedule for longer sessions, but I couldn’t use it without a yard.
Taking photos of the sun and moon
Sun and moon tracking are two of the Dwarf 3’s best features since they’re so easy to use.
The Dwarf 3 is also capable when photographing the sun and the moon. It’s a lot easier since you use the default Photo Mode. For example, you simply center the telephoto lens on the moon before activating the moon tracking function — the telescope does the rest. This setting runs using a simple algorithm, so it begins tracking almost immediately — there’s no calibration phase.
To take photos of the sun, you’ll need to attach the included magnetic solar filters first. Based on my time with the Dwarf 3, the solar images look excellent and do a great job of capturing sunspots. While I don’t have any experience with the Dwarf II, the previous model, I like that you don’t need to buy solar filters separately on the Dwarf 3.
Surprising versatility for other types of photography
I spent most of my testing time capturing images of wildlife and scenery.
Dwarf 3 has quite a few other modes beyond astrophotography, hewing close to what you’d expect from some point-and-shoot cameras. The Photo and Video Modes work as advertised — I really enjoyed finding birds and interesting subjects to photograph. I love how you can quickly toggle between the telephoto and wide lenses in the app, and there’s even a preview option that opens a small window showing what the lens sees, even when you’re not currently using it.
You can even use object tracking to follow subjects while capturing the still shots along the way. Once tracking is on, you drag a square around the bird, person or anything you want the camera to follow. Sometimes, the Dwarf 3 will get confused when birds cross paths — but you can quickly reset the tracker to your intended target. Burst Mode isn’t much different than Photo Mode, except that it offers a faster way to capture multiple shots in a row. I didn’t spend much time in Burst Mode, but it’s great for catching stunning images of a bird taking flight.
I got a great shot of an eagle in the tree above me.
When I was reviewing video footage, I initially noticed some stuttering in the video but traced the issue to my ancient laptop, which struggles to display 4K videos from this camera. Fortunately, playing the downloaded video back on my phone was much smoother. However, the object tracking can be a bit aggressive in video, so I recommend lowering the motor speed to smooth out the camera’s movements.
I had a lot of success with the Time Lapse Mode, which can also do sun, moon and object tracking, though I didn’t use it for long. DwarfLab added Auto-Capture Mode about a week after I began testing. It’s essentially a video mode that always uses tracking for birds or “UFOs” for moving light in the night sky. I like that you can quickly set up tracking without digging through menus, but it automatically finds the target instead of letting you choose one. Auto-Capture Mode is fine for split-second decisions when there’s a single target in the frame, but not when it’s in a group.
Panorama blues
DwarfLab says it will eventually add a panorama stitching feature, but I found Pano Mode mostly unusable in my tests. It could work for me if I had a little more time and patience, but I look forward to having an automatic solution in the future.
One of Dwarf 3’s most exciting features is the option to take massive gigapixel panoramas with the telephoto lens, but it wasn’t ready in time for my tests. To use this mode, you center the telephoto preview in the middle of the panorama you want to take and choose how big the grid should be. Unfortunately, there’s no preview of the final panorama yet, so you have to make your best guess.
Another issue I had with Dwarf 3’s panorama mode is that there’s no stitching function available. You need to use third-party panorama software, though none of the free options I tried on my MacBook really worked. I also tested DwarfLab’s recommended process for Windows but gave up after the software crashed a few times. Paid software is probably your best bet here, but I didn’t try it for this review.
Even without the panorama mode, I can’t complain about the quality of Dwarf 3’s camera.
My last hangup with the panorama mode is that you need to connect the Dwarf 3 directly to a computer or phone using a USB cable to access the folder with the captures. Unlike the Dwarf II, there’s no removable microSD card, and you can’t transfer the panorama images using the mobile app. While I understand it might take a while if you have hundreds of photos, there’s no restriction on doing so with photos and videos taken using other modes. For now, I suggest that beginners should steer clear of this feature.
Should you buy the Dwarf 3?
The Dwarf 3 is an entirely different kind of smart camera than I’m used to, an actual telescope.
My focus on the smart home typically has me spending an inordinate amount of time around security cameras, which usually aren’t as fun to test as the Dwarf 3 has been. It’s understandable since security cameras aren’t made for photographers, even when they come with creative features like time-lapse.
Most of the features are easy for beginners, and even advanced users will find something to like. While I don’t think it will replace the traditional tools that astrophotographers and nature fans use, it’s an excellent way to expand your arsenal or take up a new hobby. At $500, it’s probably a little too expensive for an impulse buy, but affordable for enthusiasts.
Overall, I’m a fan of the Dwarf 3 smart telescope and how portable it is. It takes a lot of the stress out of photography and reminds me why I love the hobby in the first place.
